基于文本嵌入和 CLIP 图像嵌入的多模态检索
LlamaIndex 在 2023 年 10 月 27 日星期五发布了关于多模态检索的示例 NOTEBOOK,本文一起来学习尝试一下。
本文涉及的内容是基于 Google colab,了解详细的实现后,按照该笔记本中概述的步骤及其许多示例代码片段来实现鸟类 RAG 管道。
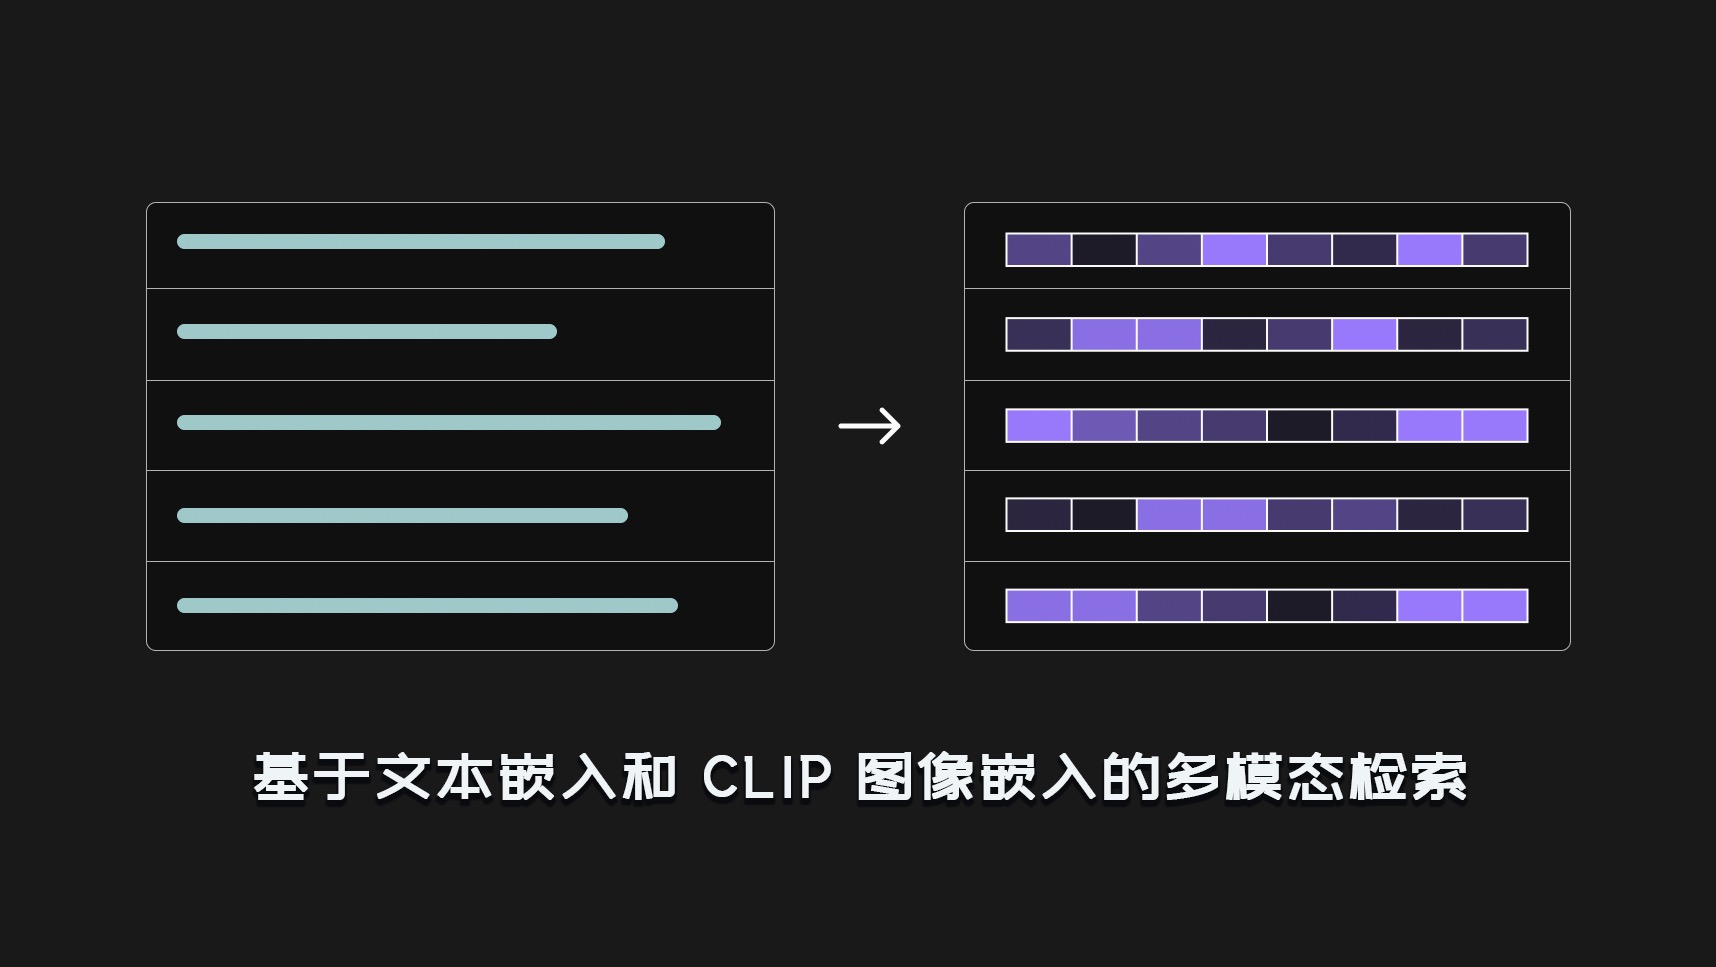
高层架构图
多模式鸟类 RAG 管道的高级架构图如下所示:
涉及的主要步骤是:
- 从网站下载鸟类文本和图像,并将它们分别存储在各自的目录中。
- 使用
BAAI/bge-base-en-v1.5对文本进行索引,定义文本查询引擎,并将文本嵌入存储在Qdrant的birds_text集合中。 - 使用 OpenAI CLIP 模型对图像进行索引,并将图像嵌入存储在 Qdrant 的
bird_img集合中。 - 在查询期间,生成文本和 CLIP 查询嵌入,并检索文本和图像。
RAG 管道中使用的模型:
- 用于图像嵌入的 OpenAI CLIP 模型
ViT-B/32。 BAAI/bge-base-en-v1.5用于文本嵌入。gpt-3.5-turbo作为文本响应合成的LLM。
第 1 步:下载鸟类文本和图像
在美国鸟类保护协会网站上发现了很多鸟类。将该页面下载到 Colab 笔记本中,将其存储在 data 目录下。代码片段如下:
!mkdir data
!mkdir images
# 将网页下载成html文件并存储在本地
!curl https://abcbirds.org/blog/backyard-birds/ --output ./data/backyard-birds.html

from pathlib import Path
from llama_index import download_loader
from llama_index import SimpleDirectoryReader

# 将下载的文件作为非结构化文档加载
UnstructuredReader = download_loader('UnstructuredReader')

# 将 ./data/ 目录中的所有非结构化数据文件加载到列表中。
dir_reader = SimpleDirectoryReader('./data', file_extractor={
  ".html": UnstructuredReader()
})
documents = dir_reader.load_data()
print(f'Loaded {len(documents)} documents')
在本地保存该网页时,将该页面上的所有鸟类图像收集到 notebook 的 images 目录中。然后,循环遍历 images 目录并创建一个字典来存储每个图像的图像元数据。图像元数据包括文件名和文件路径。
import os

# 存储图像元数据,包括文件名和路径
image_metadata_dict = {}

# 获取 images 文件夹中所有图像文件的列表
image_files = os.listdir("images")

# 循环遍历每个图像文件并添加元数据
for image_file in image_files:
  image_path = os.path.join("images", image_file)

  # 获取图像文件名
  image_filename = os.path.basename(image_path)

  # 获取图片文件路径
  image_file_path = os.path.abspath(image_path)

  # 创建字典来存储图像元数据
  image_metadata_dict[image_filename] = {
    "filename": image_filename,
    "img_path": image_file_path,
  }
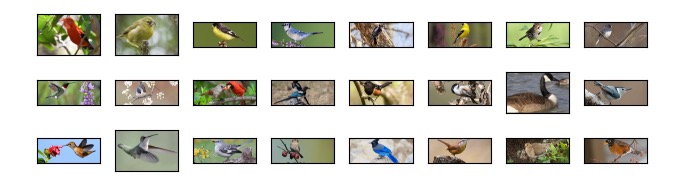
生成所有图像的元数据后,想查看加载的所有图像。请参阅下面的代码片段。plot_images 函数将图像元数据字典作为输入,并在网格中绘制最多 64 个图像。该函数迭代元数据字典中的图像文件名。对于每个图像,它会检查图像文件是否存在。如果是,该函数将打开图像,将其转换为 RGB 颜色空间,并将其绘制在 8x8 网格的子图中。该函数还禁用轴上的刻度标签以使绘图更清晰。最后,该函数收紧绘图的布局并显示它。
from PIL import Image
import matplotlib.pyplot as plt
import os

# 在网格中绘制多个图像的简单而有用的方法
def plot_images(image_metadata_dict):
    images = []
    images_shown = 0
    for image_filename in image_metadata_dict:
        img_path = image_metadata_dict[image_filename]["img_path"]
        if os.path.isfile(img_path):
            # 打开图像文件并将其转换为 RGB 色彩空间。
            filename = image_metadata_dict[image_filename]["filename"]
            image = Image.open(img_path).convert("RGB")

            # 在 8x8 网格的子图中绘制图像,还禁用轴上的刻度标签以使绘图更清晰。
            plt.subplot(8, 8, len(images) + 1)
            plt.imshow(image)
            plt.xticks([])
            plt.yticks([])

            images.append(filename)
            images_shown += 1
            if images_shown >= 64:
                break

    plt.tight_layout()

plot_images(image_metadata_dict)
在 Colab notebook 中运行上面的代码片段,得到了漂亮的后院鸟类的拼贴画!太棒了,鸟类文本和图像已按预期加载。
步骤2:为向量存储建立文本索引并定义文本查询
文本和图像全部加载后,接下来继续构建文本索引。使用 Qdrant 作为存储数据库。在 birds_text 集合下为鸟类文本构建矢量存储。
本文不使用 OpenAI 文本嵌入模型 text-embedding-ada-002,而是尝试使用开源模型 BAAI/bge-base-en-v1.5。如何通过传入 llm、gpt-3.5-turbo 和 embed_model、local:BAAI/bge-base-en-v1.5 来构造 service_context,它将嵌入模型下载到 Colab notebook。然后创建文本索引并定义文本查询引擎。下面是代码片段。
import qdrant_client
from llama_index import (
    ServiceContext,
    SimpleDirectoryReader,
)
from llama_index.vector_stores.qdrant import QdrantVectorStore
from llama_index import VectorStoreIndex, StorageContext
from llama_index.llms import OpenAI

# create QdrantClient with the location set to ":memory:", which means the vector db will be stored in memory
text_client = qdrant_client.QdrantClient(location=":memory:")

# load text documents from the data directory
text_documents = SimpleDirectoryReader("./data").load_data()

# define llm and embedding model in ServiceContext
service_context = ServiceContext.from_defaults(
    llm=OpenAI(model="gpt-3.5-turbo", temperature=0.1),
    embed_model="local:BAAI/bge-base-en-v1.5"
)

# create QdrantVectorStore using QdrantClient and the collection name "birds_text"
text_vector_store = QdrantVectorStore(
    client=text_client, collection_name="birds_text"
)

# create StorageContext object using the QdrantVectorStore
storage_context = StorageContext.from_defaults(vector_store=text_vector_store)

# create VectorStoreIndex using the text documents and StorageContext
birds_text_index = VectorStoreIndex.from_documents(
    text_documents,
    storage_context=storage_context,
    service_context=service_context
)

# define text query engine
text_query_engine = birds_text_index.as_query_engine()
第 3 步:使用 OpenAI CLIP 嵌入为矢量存储构建图像索引
对于图像索引,需要首先加载并初始化 OpenAI CLIP 模型 ViT-B/32。这个模型使用 Vision Transformer (ViT) 架构来编码图像,并使用因果语言模型来编码文本。ViT 架构将图像进行切片,在本例中 patch size = 32,然后使用 Transformer 编码器对每个切片进行编码。因果语言模型是一个在文本数据上训练的转换器编码器。
load() 函数返回一个包含模型和预处理器的元组,预处理器用于标准化输入图像并将其中心裁剪为模型期望的分辨率,代码如下:
import torch
import clip
import numpy as np

# load the CLIP model with the name ViT-B/32
model, preprocess = clip.load("ViT-B/32")

# the resolution of the input images expected by the model
input_resolution = model.visual.input_resolution

# the maximum length of the input text
context_length = model.context_length

# the size of the vocabulary used by the model
vocab_size = model.vocab_size

# print the information about the model to the console
print(
    "Model parameters:",
    f"{np.sum([int(np.prod(p.shape)) for p in model.parameters()]):,}",
)
print("Input resolution:", input_resolution)
print("Context length:", context_length)
print("Vocab size:", vocab_size)
现在,为每个图像生成 CLIP 嵌入,代码片段如下:
# 设置用于 CLIP 模型的设备,CUDA (GPU) 或 CPU
device = "cuda" if torch.cuda.is_available() else "cpu"
print(device)

# 存储每个图像的图像嵌入
img_emb_dict = {}
with torch.no_grad():

    # 迭代图像元数据字典并提取每个图像的图像嵌入
    for image_filename in image_metadata_dict:
        img_file_path = image_metadata_dict[image_filename]["img_path"]
        if os.path.isfile(img_file_path):
            image = (
                # 使用 CLIP 模型的预处理功能对图像进行预处理
                # 解压缩图像张量以添加批量维度
                # 将图像张量移动到第 1 行指定的设备
                preprocess(Image.open(img_file_path)).unsqueeze(0).to(device)
            )

            # 使用CLIP模型的 encode_image 函数提取图像特征
            image_features = model.encode_image(image)

            # 将图像特征存储在图像嵌入字典中
            img_emb_dict[image_filename] = image_features
在 Qdrant 集合 birds_img 下构建 CLIP 图像嵌入索引。
from llama_index.schema import ImageDocument

# 创建 ImageDocument 对象列表,每个对象对应数据集中的每个图像
img_documents = []
for image_filename in image_metadata_dict:
    # img_emb_dict 字典包含图像嵌入
    if image_filename in img_emb_dict:
        filename = image_metadata_dict[image_filename]["filename"]
        filepath = image_metadata_dict[image_filename]["img_path"]
        print(filepath)

        # 为每个图像创建一个 ImageDocument
        newImgDoc = ImageDocument(
            text=filename, metadata={"filepath": filepath}
        )

        # 在 ImageDocument 上设置图像嵌入
        newImgDoc.embedding = img_emb_dict[image_filename].tolist()[0]
        img_documents.append(newImgDoc)

# 创建 QdrantVectorStore,集合名称为 birds_img
image_vector_store = QdrantVectorStore(
    client=text_client, collection_name="birds_img"
)

# 定义存储上下文
storage_context = StorageContext.from_defaults(vector_store=image_vector_store)

# 定义图像索引
image_index = VectorStoreIndex.from_documents(
    img_documents,
    storage_context=storage_context
)
现在来定义图像查询的函数,为此步骤定义了三个函数。
retrieve_results_from_image_index:将文本查询作为输入并从矢量存储中返回最相似的图像。image_retrieval_results:获取图像检索结果列表并创建一个尺寸为16 x 5英寸的新图形。image_query:是调用上面两个函数的包装函数。
from llama_index.vector_stores import VectorStoreQuery

# 将文本查询作为输入并从向量存储中返回最相似的图像
def retrieve_results_from_image_index(query):

    # 首先标记文本查询并将其转换为张量
    text = clip.tokenize(query).to(device)

    # 使用 CLIP 模型对文本张量进行编码以生成查询嵌入
    query_embedding = model.encode_text(text).tolist()[0]

    # 创建一个 VectorStoreQuery
    image_vector_store_query = VectorStoreQuery(
        query_embedding=query_embedding,
        similarity_top_k=1,
        mode="default",
    )

    # 针对图像矢量存储执行查询
    image_retrieval_results = image_vector_store.query(
        image_vector_store_query
    )
    return image_retrieval_results


# 获取图像检索结果列表并创建一个尺寸为 16 x 5 英寸的新图形
def plot_image_retrieve_results(image_retrieval_results):
    plt.figure(figsize=(16, 5))

    img_cnt = 0
    # 迭代图像检索结果,对于每个结果,在子图中显示相应的图像及其分数。
    # 子图为 2 x 3,图像显示在 img_cnt + 第 1 个子图中。
    # 子图的标题是图像的分数,格式为小数点后四位。
    for returned_image, score in zip(
        image_retrieval_results.nodes, image_retrieval_results.similarities
    ):
        img_name = returned_image.text
        img_path = returned_image.metadata["filepath"]
        image = Image.open(img_path).convert("RGB")

        plt.subplot(2, 3, img_cnt + 1)
        plt.title("{:.4f}".format(score))

        plt.imshow(image)
        plt.xticks([])
        plt.yticks([])
        img_cnt += 1


# 定义 image_query 函数
def image_query(query):
    image_retrieval_results = retrieve_results_from_image_index(query)
    plot_image_retrieve_results(image_retrieval_results)
步骤 4:对示例查询的图像和文本进行多模态检索
这是本次 POC 中最有价值的部分!
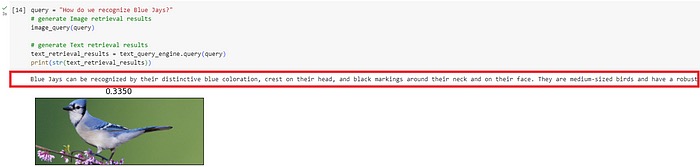
Question 1: How do we recognize Blue Jays?
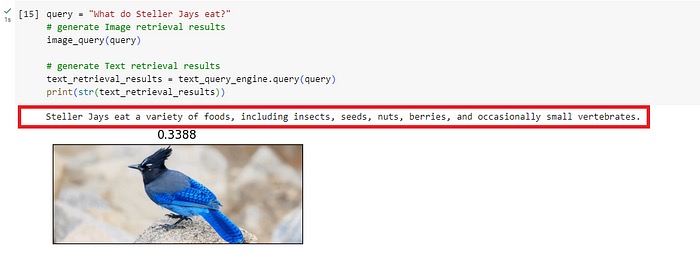
Question 2: What do Steller Jays eat?
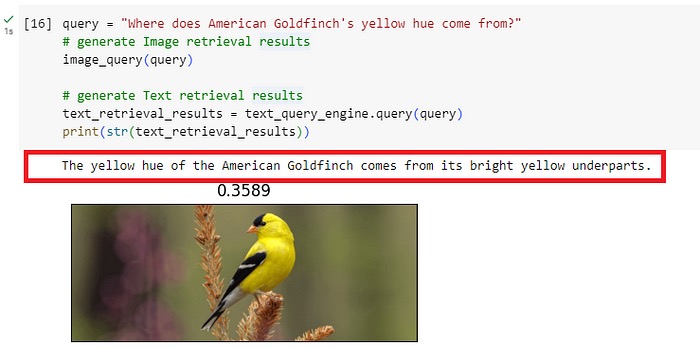
Question 3: Where does American Goldfinch’s yellow hue come from?
看到这些美丽的图像和问题的文字答案一起返回真是太酷了!